
How to use the MP-Desktop Proactive Settings in System Options
Introduction
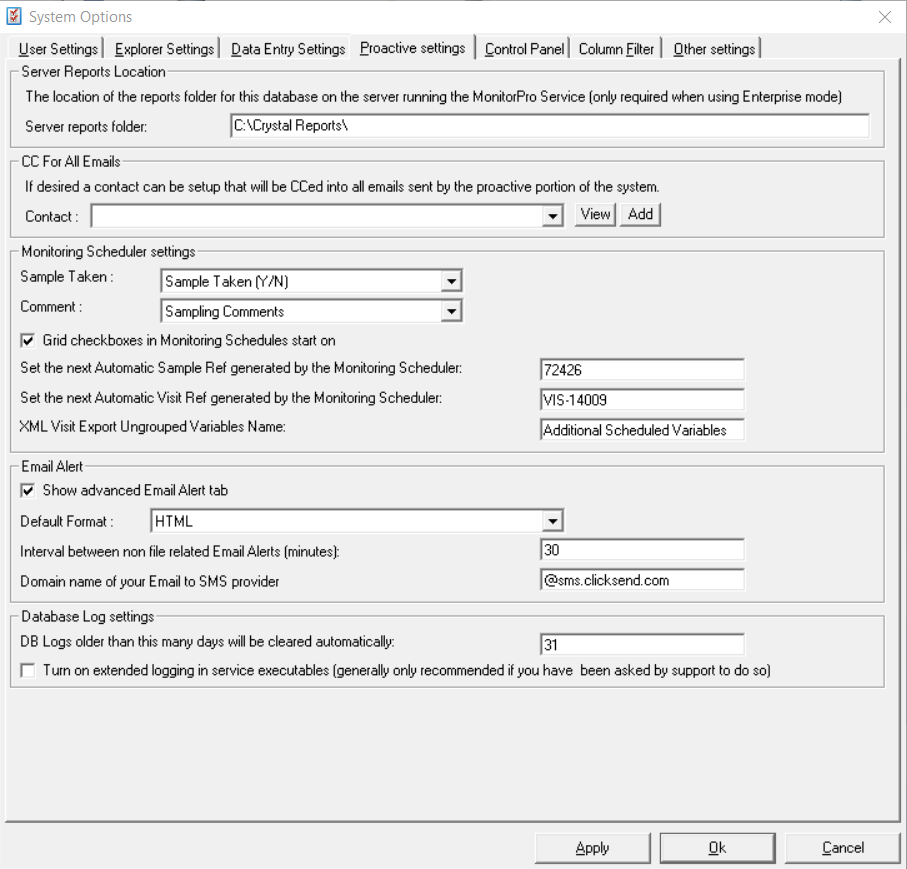
The Proactive settings cover a range of items managing the automation of the system.
Proactive Settings
Server Reports Location - Users can manage the location where Crystal Reports Folder is stored for use on the Server. This is effectively where reports will run from when automated using Scheduled Tasks or Email Alerts. This can be different to where a user's reports folder is saved or the same if this is on a network or shared drive.
CC for Emails - A email can be configured here to receive all emails generated from the system.
Monitoring Scheduler - These settings are associated with the Monitoring Scheduler and set how a number of functions operate.
- Sample Taken - Along with the Sample Comment, the Sample Taken can be used to update a Visit that a sample has been taken. This setting is mapping to a Variable (one likely needs to be created for this purpose) and can be used to import these settings via an imported file. To update the Sample Taken Status, users need to import against the mapped Variable 'Yes'/'No' or 'Y'/'N' as the value. This data will then be imported as data for later reporting, but will also update the Sample Taken Status in a matching Visit.
- Sample Comment - Along with the Sample Taken, the Sample Comment can be used to update a Visit with a Sample Comment. This setting is mapping to a Variable (one likely needs to be created for this purpose) and can be used to import these settings via an imported file. This data will then be imported as data for later reporting, but will also update the Sample Comment in a matching Visit.
- Grid Checkboxes start on - In a Monitoring Schedule, the Exclusion Grid will by default start checked. It can be set to start unchecked by deselecting this option.
- Set the Automatic Sample Ref - Monitoring Schedules can be set to auto-create Sample References. This setting can be used to start the Sample Reference count from a set value and set a prefix.
- Set the Automatic Visit Ref - Visits are created with auto-created Visit References. This setting can be used to start the Visit Reference count from a set value and set a prefix.
- XML Visit Export - The Visit Export is a way to communicate sampling requirements to supported laboratories. This option enables users to name how ungrouped Variables are presented.
Email Alerts - These settings are associated with the Email Alerts and set how a number of functions operate.
- Show Advanced Email Alerts - The Advanced Email Alerts enable users to configure sending 'Advanced' Email Alerts. These enable users to email reports based on the importation of data, unlike the Task Scheduler which is fixed on a set frequency. To use this functionality a specific Email Alert Report Template is required.
- Default Format - This enables emails to be sent as HTML or plain text.
- Email Alert Interval - Typically Email Alerts are triggered based on data entry, however where these are not data-driven the interval is set here, with a default of 30mins.
- SMS Domain - Where the Email Alerts are set to create SMS the SMS providers domain needs to be correctly set here.
Database Log - These manage the Database Log settings. Logs are cleaned up to maintain space and the number of days before they are removed. There is also an option to turn on an additional logging (typically done where there is a specific issue to investigate).