
How to use the Regulatory Notifications Custom Forms
Introduction
Custom forms are data entry screens for capturing specific data workflows or processes in MonitorPro.
In England and Wales operators regulated by an Environmental Permit must make certain submissions to the regulator about emissions, incidents and breaches. These are submitted in a particular form layout and include relevant information about the event. MonitorPro has developed a custom form for the purpose of clients submitting data to the regulator in such a way.
Dataset
First, it may be desired to make a Dataset which will enable users to more easily locate the data they wish to include in the Notification(s).
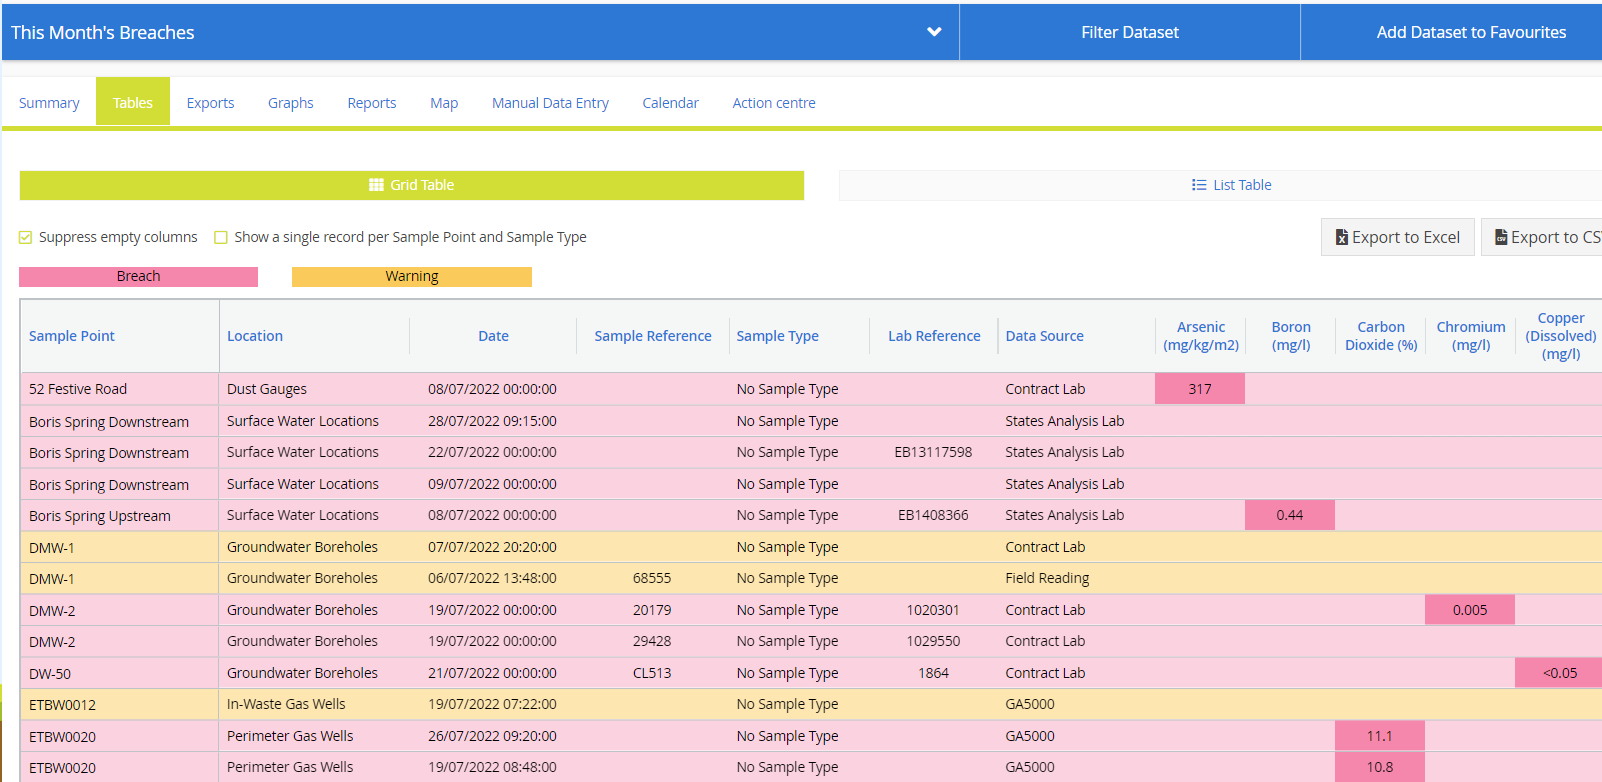
Using the dynamic filters for a suitable time range (such as weekly or monthly) and then the advanced option to include only breaches.
You can still raise Notifications from broader Datasets, perhaps specifically refined to a particular Site of interest. When accessing the Action Centre it will refine the Dataset down to only breaches (with further options as detailed below. To make it easier to find recent data yet to be reported upon it's still prudent to limit the Dataset to a small date range depending on data volumes.
Action Centre
From the Dataset navigate to the Action Centre tab.
Action Plan Breaches - This enables physical data breaches to be added to Action Plans and Notifications
Notifications based on Breaches of Data
Choose Action Plan Breaches to set up an Action Plan and Notification for a data breach(es).

Users will be presented with a summary screen. This will display the breaches contained within the Dataset grouped by Severity (these are the Importance Levels assigned in a Compliance Level, and then applied to a Compliance Rule).
The summary also highlights any which have been added to a Plan and that Plan Status (whether it's been closed/submitted).
The next table shows the individual breaches and any Action Plans they are associated with. Users can drill down into those Plans from the link.

Filter List
The data included is already filtered by the Dataset, however, it can be further refined to exclude data that does not need to be added to an Action Plan or Reported upon in a Notification.

For example, the Compliance setup might have all non-reportable breaches set to the importance of Warning or Internal. Therefore those breaches can be excluded from the list using the filter by options.
Note
There might need to be a rationalisation of the Compliance set-up to ensure that non-reportable data can easily be excluded. If there is high-frequency logger data for example and this is not differentiated by Data Source or Variable in the Compliance, it may need to be updated to easily differentiate onward reporting via the Notifications.
Ignoring data
Even after filtering, it might be desired to ignore data that doesn't need to be reported via a Notification. To do this simply select the tick box next to the relevant data and click on the ignore button in the top right.
Adding to a Plan
First, select the data to be included in the Plan. There is no right or wrong grouping here, but what works for your desired workflow and agreed reporting deadline.

Tip
A Notification could simply be an individual record. It could be a batch of records from the same sample or the same sampling/monitoring event. It's equally possible to add multiple ongoing breaches to an initial or for example monthly Plan for Notification.
Once selected click on the Add to.
Plan Type - When creating a New Plan first choose the Plan Type which will be Schedule Notification.
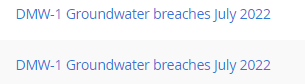
Plan Name - This name should be suitable to allow for later retrieval and it's sensible to include the date or date range to represent the included data. For example, 'DMW-1 July 2022 pH'. In the Notification process, the Site/Location name will also be appended to the name.
Assign to - Choose a User from the list to make responsible for the tasks within the Action Plan. For the purposes of the Notifications the Tasks are effectively the submission of the Regulatory Notification itself, so in most cases choose your own user.
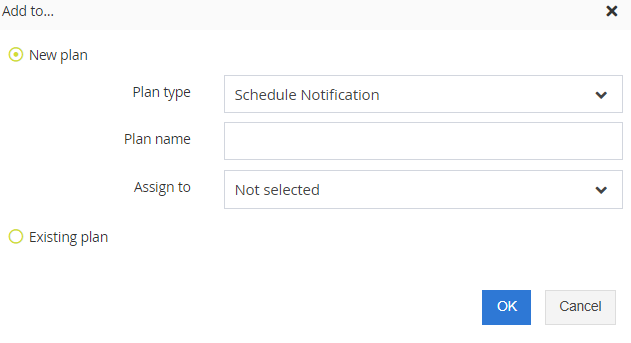
Click OK and the Plan will be created. To then go to the Plan to submit your Notification click on the link which will now be present next to the data.
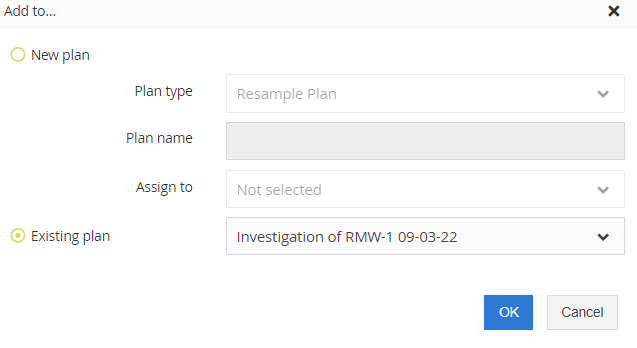
Another option is to add additional data to an existing Plan. To do this choose the data and then choose the Existing Plan button. Choose the required Plan and the data will be added to this. Ensure the plan being used is of the correct Plan Type as configured when the first Plan was created.
Note
Notifications can be saved as drafts and data added at a later date if required using the above process.
The Action Plan
The Action Plan is the placeholder for the data and any Tasks associated with the chosen Plan Type.
Notifications are split into two Tasks, Part A and Part B. They can be done independently and the Notification is saved as a draft if needed.
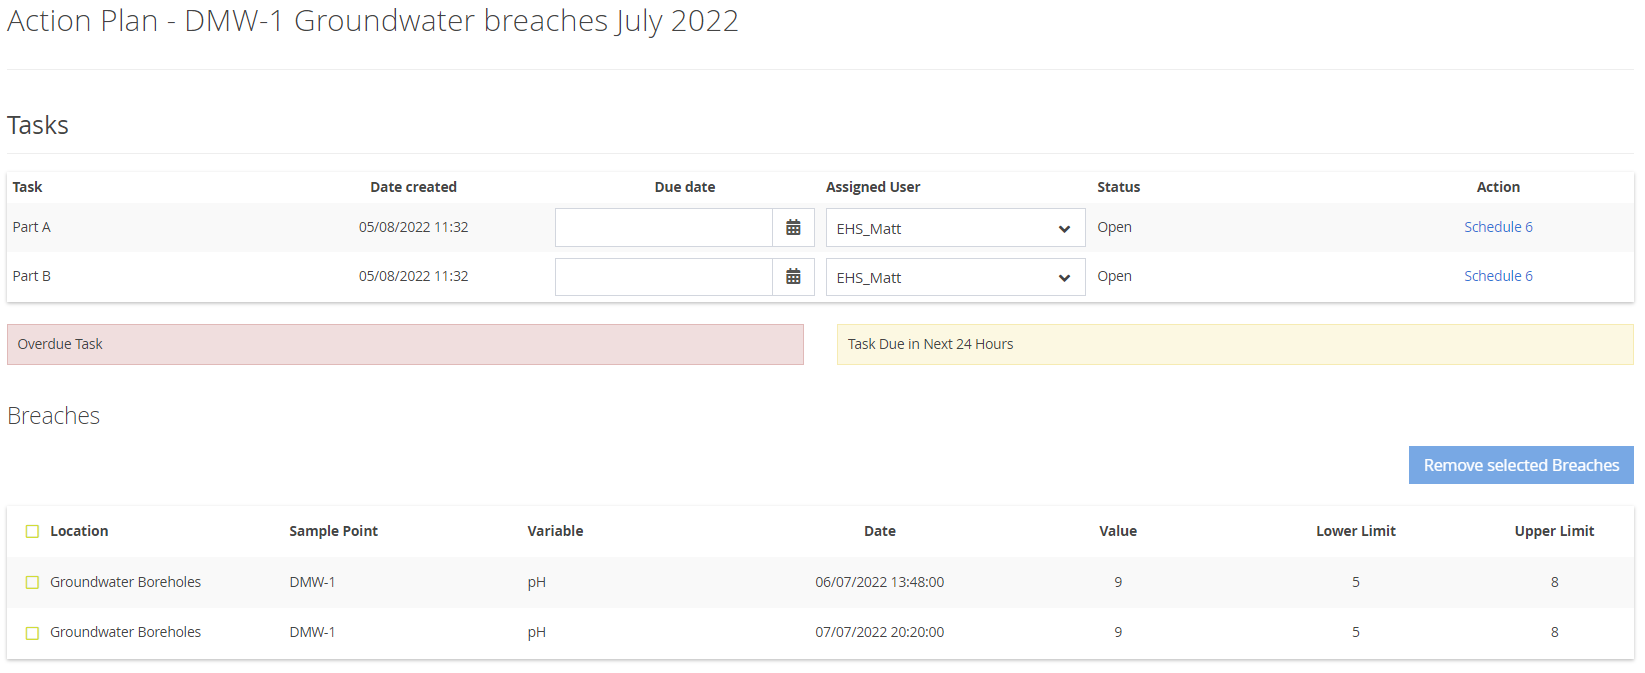
Due dates can be set and the default User changed to another assigned user if required.
Note
If data has been mistakenly added to a Plan it can be removed by selecting the required data and using the Remove Selected Breaches button. These breaches can then be added to a different plan as required.
Completing the Notification
Click on the Notification Action link to start completing the submission. Users can navigate to Part A or Part B.
Note
It's intended that Part A be completed first, however, once this has been completed then Users can return to Part B directly at a later time.
Part A
Part A will be prepopulated where the data is already contained in MonitorPro for the Permit Number and the Location. Further manual changes can be made.
The date will default to the current date but can be amended as required.
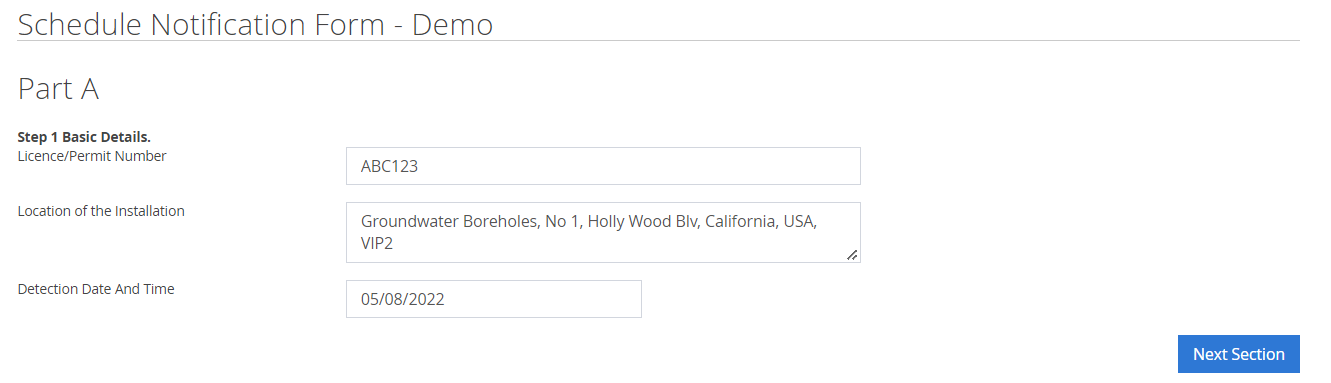
Then click on the Next Section and populate the required fields. The notification period is set to 24hrs but can be amended.
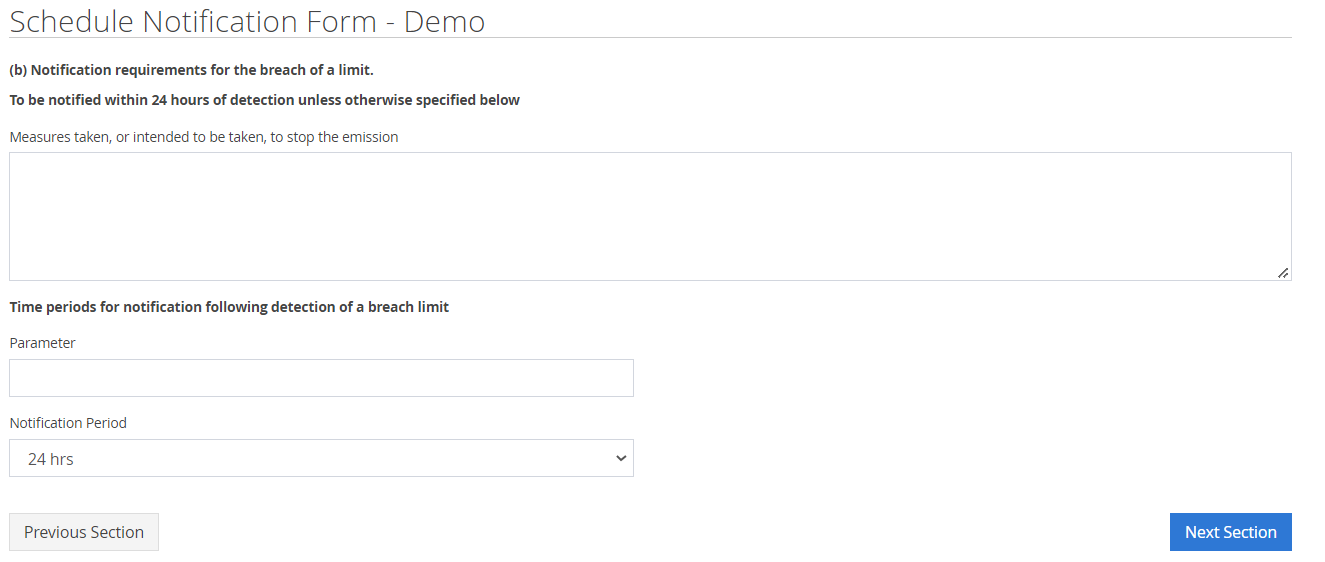
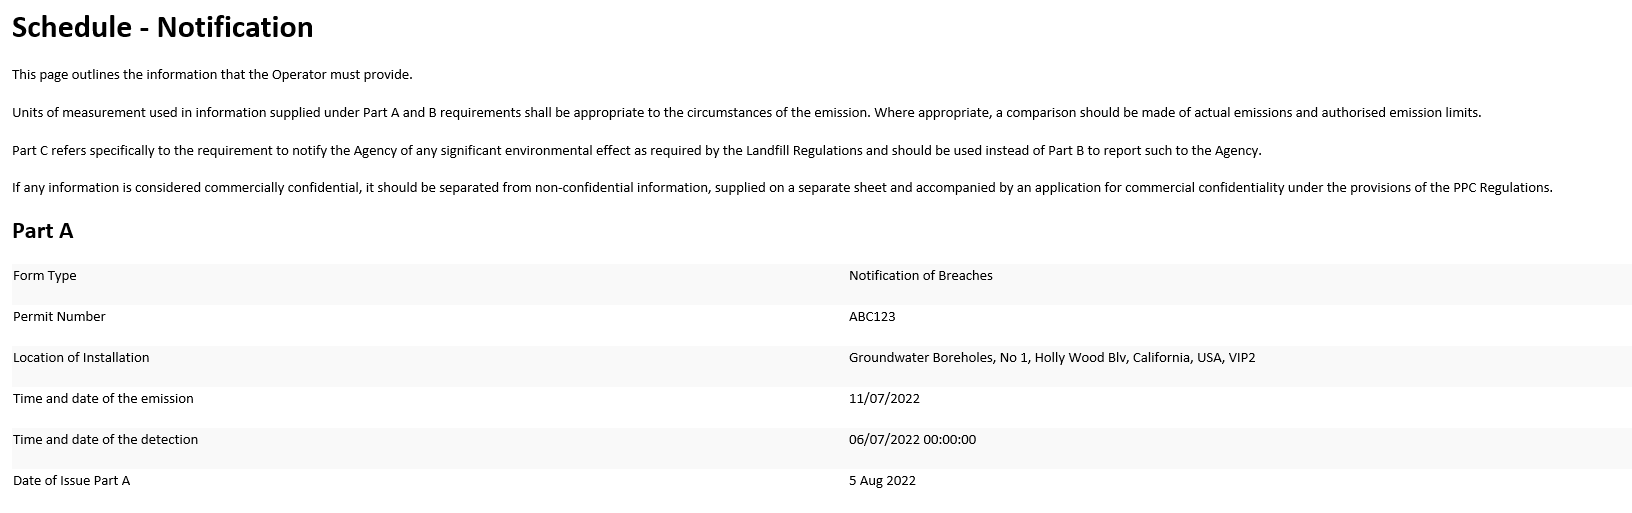
Then click on the Next Section which will provide you with a summary of Part A.
Part B
Complete the required fields of Part B.
MonitorPro will extract from the database any breaches that have occurred at the location(s) in the prior 24 months. These can also be excluded if desired by checking the exclude option.
Note
The breaches here are limited to those of Breach and High Priority Breach. If the data included here is too wide or too narrow then it might be required to rationalise the Compliance and set the Importance in the relevant Compliance Levels to include or exclude data from here as required.
Next will take you to a summary of the Notification. From here it can be Submitted, either as a Part A only, a Part A and B or as a Draft.
Once successful a pop-up will show the submission was successful.
The Notification is set up to email a copy to your user and also a nominated user. The Notification will be emailed with the contents in the HTML email body.
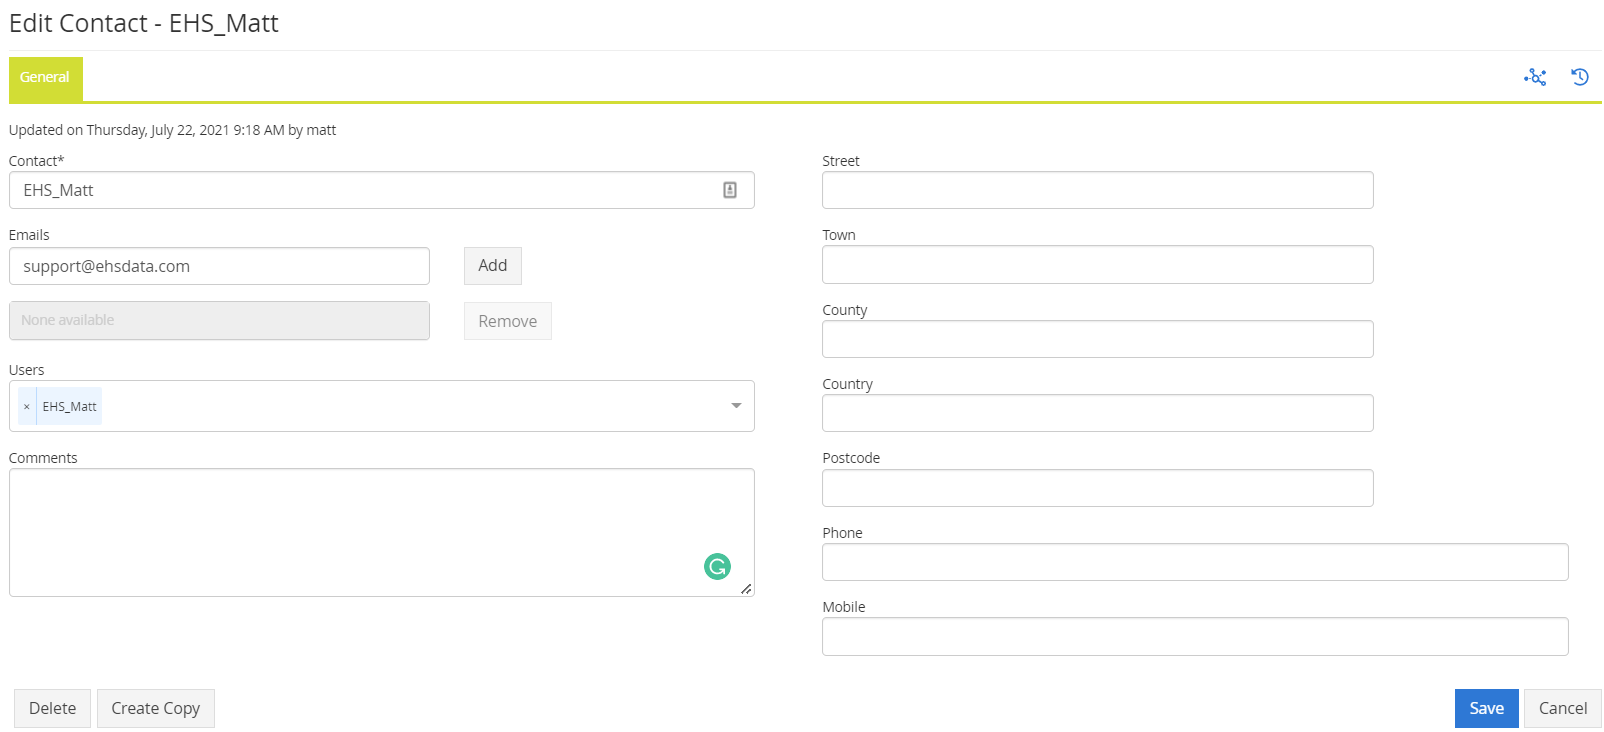
Emailing the User
A User doesn't have an email address as a property, but as with other areas of the application, it uses the email address in the Contact with which that User is associated. Make sure that there is a Contact for yourself and that the User accessing MP-Web is associated with that Contact.
Emailing Generic/Nominated Contact
The nominated user could be a common email address used to simply store a record of the Notifications centrally. Alternatively, it could be used to send to the Regulator directly.
The nominated user is configured in System Options under the Schedule Submissions Contact ID. In this field, a valid Contact needs to be included with a corresponding email address set in that Contact.
Tracking Emails and Troubleshooting
The Email Log can be used to track all emails sent including those from the Notifications. Users can drill into an email, see the status and retry after resolving any issues.

Task Status
Once the Notifications have been sent then the Status of Part A and Part B will be updated to closed. From the Control Panel and then Action Plan, an overview of all the Plans can be observed and filtered on Status or Plan Type. Colour coding is dictated by any due dates set within the Plan (this is not based on the duration of submission from the event).

Drilling into any Plan will highlight the associated data. The Action links will take you to the submitted Notification and a Printable version can also be accessed if needed from here after submission.
My Tasks
From the Action Centre, a My Tasks button will take a User to their own list of allocated Tasks. These will show the Status of those Tasks and they can be updated from here also.