
How to use the Find and Replace Tool in MP-Desktop
The Find and Replace can be accessed from the Control Panel\Find and Replace or Tools\Find and Replace.
Click on the icon to open up the dialogue.
Dataset
It's likely the first thing the user needs to do is set up or modify the Current Dataset. The Current Dataset is used to filter down the data to be changed.
How you do this will depend on what data you need to amend.
For example, you might want a very wide range of data with respect to the Sample Points, so all of these would be chosen. The user would however filter down the Dataset to include only data from one specific Variable, which was incorrect and needed moving to another (perhaps to consolidate two common Variables).
This can be further refined using the Date Range should the error only be apparent in a limited set of data, between 2 years for example.
It's possible the Dataset would be set up to include all Dates, Sample Points and Variables but filtered to one specific Data Source or Sample Type that was incorrect or needed to be consolidated.
The final option is to use the Advanced options to really refine the data. This can be useful if data has been imported against the wrong Units for example. In this scenario, it would be possible to include only data above or below a specific value.
Tip
It's possible to include multiple Objects to be moved in one Dataset and refine them in the next step. However, to avoid confusion it is often best to keep the Dataset selective to each task unless experienced in the use of the tool.
Find and Replace
Once done choose the type of Object from the list. So if users wish to move data from one Sample Point to another, choose Sample Point. All data which fits the Dataset will then be moved from one Sample Point to the other.
In the Find what select the specific Object where the data is. In the case of Sample Points, this would be the name of the Sample Point, such as BH1.
In the Replace with choose the specific Object where the data is to go to, such as BH-1.
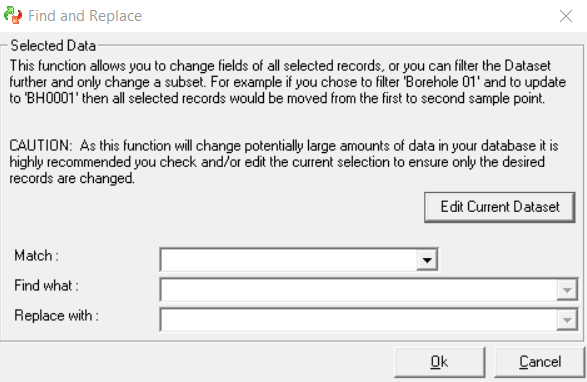
After clicking OK, MonitorPro will indicate the number of records that will be moved. It's important to check this number is the amount you expect to move. If unsure go back to the Current Dataset, and if needed use the Quick View to check the data about to be moved.
Once happy click OK and confirm the Find and Replace. Once completed check the data to ensure the move has been completed as expected.
Depending on the move being made it's possible that the results cannot be easily undone, so care should be taken before confirming. It may involve the reimportation of data or in extreme cases need the MonitorPro database to be restored from a previous backup.
Warning
The biggest risk with the Find and Replace is that it will overwrite data that is present already in the Replace with Location/Variable/Sample Type. It's therefore often wise where there is potential for overlapping data to check not only the Find what data but also the Replace with data, to avoid any overlaps.