- Knowledge Base and Manual
- MP-Web
- Mapping Tab
-
Installation
-
Integration
-
MP-Desktop
-
MP-Web
- Introduction
- Access
- Side Bar Navigation
- Dashboard
- Favourites
- Datasets
- Summary Tab
- Tables Tab
- Export Tab
- Graphical Tab
- Report Tab
- Mapping Tab
- Manual Data Entry
- Calendar Tab
- Action Plans
- Custom Forms
- Contacts and Alerts
- Compliance
- Task Scheduler
- Monitoring Scheduler
- Calculator
- Data Entry
- Email Importer
- Object Management
- Obligations
- Policies
- Administration
- Administration - Manage Users
- Administration - Datasets
- Administration - Internationalisation
- Administration - Email Importer
- Administration - Monitoring
- Administration - Advanced
- Culture
-
MP-Field
-
Release Notes
-
Reporting
-
Configuration
-
Trial and Demo
-
Monitoring Types
MP-Web Output - Mapping Areas
MP-Web Mapping Areas
Mapping areas can be used to delineate areas for several reasons. Examples might be Permit boundaries, areas of restoration, or groups of sample locations like borefields. Once created areas can be associated with as many Datasets as required.
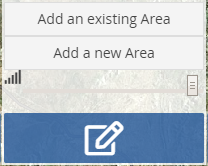
To add a new area select the relevant icon found on the bottom menu of the mapping. You can then either add a new area or associate an existing area with the Dataset currently selected.
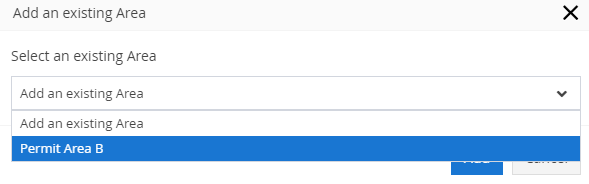
If you select to add an existing area then you'll be presented with a list of the current areas which can be added to the map. This association will be saved until they are later removed.
 Areas that have been added can then be managed from the menu. Clicking on the x will remove the area from the Dataset. The eye icon will zoom to the extents of the area and the pencil icon will bring up the properties of the area for editing.
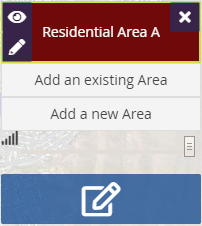
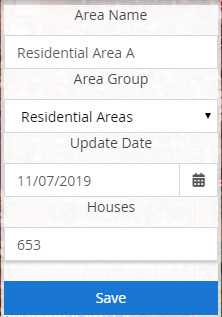
From the edit, there are several options to choose from. You can clear the area, draw or modify the area, change the colour and opacity, save and edit the information or 'meta' data associated with the area.
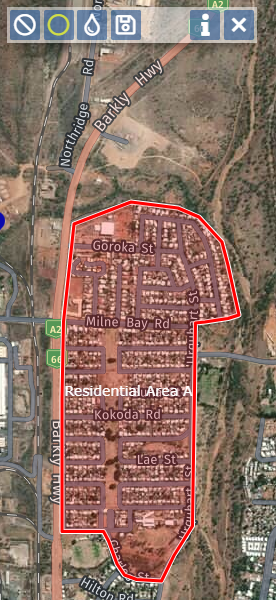
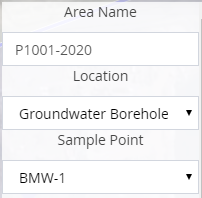
Metadata or properties of the area can be added from the 'i' or information icon. Clicking on this will open up the properties form and required information added as well as the Area Group changed. The Area Group dictates the properties which can be populated. For more on how to set up and configure these see the section under the Control Panel. Non-Admin or Managers can only add information to the areas they cannot access the management of fields.
The alternative way to associate data to an area is to link it to a Sample Point. This approach is more appropriate for larger or my dynamic datasets to be associated with an area. In the example of a borefield, Calculation Groups can be used to aggregate automatically data from each borehole into an aggregated location. Associate this aggregate location to the area.